


At the risk of being hit by the Fist of Matt Gemmell, I'm going to show how to throw up a Tweetie 2-style "wait a second" alert. Tweetie uses this when it is uploading a picture to go in a tweet being composed, or when it does other things where it needs to stop you from using the controls for a moment.
Now, you should be very careful about using something like this. You really don't want to annoy your users, so you should only do this when it's absolutely necessary and only show it for short periods of time.
The same basic technique used here can be used any time you want to mimic the appearance of system alerts and dialogs. If I have time, for example, I'd like to go back and change the Tic-Tac-Toe application from More iPhone 3 Development so that the online game picker has a similar appearance to the GameKit peer picker, which can be done with a variant of this technique.
In the simple example we're going to build today, there won't be any interactivity with the alert (such as buttons you can press), but there's no reason why the view you show couldn't have controls that the user can interact with. We will be working with an instance of UIView, so you show anything this way that can be put into a UIView. Which is basically everything.
If you want to follow along at home, create an Xcode project from the View-based Application project template and called the project CustomAlert.
To start things off, we need a background image. Apple's alerts generally have gloss caustic appearance, but for this exercise, I'm going to mimic Tweetie's translucent black rounded rectangle. I started up Acorn and created a 180 pixel by 180 pixel transparent image. I added a black rounded rectangle with 60% opacity and saved it as a .png file and add it to the Resources group in the Groups & Files pane. If you want to steal mine, you can grab it from here. You can, of course, adjust the appearance of this background image to better match the appearance of your own application.
Once the image is in the Resources folder of our project, we can use it either in code or in Interface Builder. We could do this completely in code, but I hate writing unnecessary code, so let's create the view for the pseudo-alert in Interface Builder.
Before heading to Interface Builder, we need to declare our outlets in CustomAlertViewContoller.h so that IB can see them. While we're there, let's also declare an action method which will be called when a button is pressed. That's how the user will show the alert in this particular case. We'll also add a method to update the message shown on the view, and another one to dismiss the view. Here's what CustomAlertViewController.h should look like:
Easy enough, right? Make sure you save it before continuing, or IB won't be able to see the actions and outlets.
Double-click CustomAlertViewController.xib to launch Interface Builder. First, grab an instance of UIView from Interface Builder's Library palette (⌘⇧L) and drag it to the nib's main window. Do NOT add it to the existing view. Instead, make sure to add it as a root object in the nib. We do not want it to be part of the view hierarchy until we're ready for it, so putting it here will cause the object to exist, but not be visible to the user. At this point, the nib's main window should look something like this:

If you want to rename the new view to differentiate it from the existing view, feel free to do so by single-clicking the new View icon, waiting a half-second or so, then single-clicking on it again, right on the word View. Single-click the new View icon and press ⌘3 to bring up the size inspector, and set the width and height of this view to 180 by 180 pixels (or whatever size image you used if you used a different background image):

If it won't let you change the size of the view, go to the attribute inspector (⌘1) and make sure that Simulated Interface Elements popup menus are all set to read None. If you set any other value for any of those, it will set your view's size for you and will prevent you from changing them using the size inspector. Also, make sure that the Opaque checkbox is not checked, otherwise it will ruin the effect.
Now you can double-click the new view to open it up for editing. First, drag a UIImageView from the Library. Since it's the first item you're adding, it should automatically resize to the view's size, which is what you want. Use the attribute inspector to select the image you added earlier to your Xcode project (alert.png) and make sure that the image view is also not opaque.
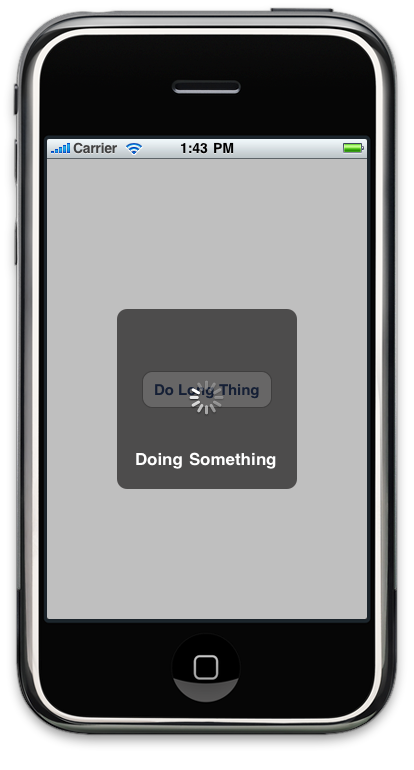
Next, add a UIActivityIndicatorView from the Library, centered in the window. Use the attribute inspector to change the style to Large White.
Drag a UILabel from the Library and place it below the activity indicator, centered. Use the attribute inspector to make sure the text is centered also. Double-click the label to change its text to read Doing Something, or whatever other message you feel like typing in.
You'll want to change the font size and color. The color can be changed using the attribute inspector, the size using the text palette (⌘T). I used white Helvetica Bold at 17 points. When you're done, it should look like this:

Our view is now built, but we have to wire up the outlets and actions before going back to Xcode. In the View's main window, control-drag from File's Owner to the icon called View that was just added. Make sure you don't select the view that existed before (which is why renaming the new one was a good idea). When prompted for an outlet, select the alertView outlet.
Double-click the newer View icon if the view we just built isn't showing, then control-drag from File's Owner to the only label on the view, connecting it to the outlet called label.
Now, we need to add a button to the other View icon, so double-click the existing View icon to open that one up. It should just be an empty gray view, like this:

Drag a Round Rect Button from the Library to this view. Place it in the center of the view and double-click the button to change its title to something that make sense. I called it Do Long Thing, but go crazy if you want.
Now, control-drag from that button you just added back to File's Owner and select the doLongSomething: action.
Save the nib and go back to Xcode. You can quit Interface Builder if you want, we're done with it.
Here is the implementation of CustomAlertViewController. You can replace the template code with this version:
Pretty simple, huh? Let's look at the three custom methods we wrote to make sure we understand what's going on.
All we have to do so that the user can see our view is to add alertView to the view hierarchy. We add it as a subclass of the controller's main view. We also set the alert view's background color to clearColor so that the transparent parts don't show up as white. In this example, I also programmatically centered the view in the window. That line of code isn't necessary if you centered the view in IB, however I like to do this programmatically just to ensure it's centered on the screen.
After that, we just have a series of calls at different delay intervals (using performSelector:withObject:afterDelay: to updateText: to change the displayed text, then a final delayed call to finalUpdate to dismiss the fake alert. Essentially, the text will change a few times over the course of five seconds and then the alert will go away.
The updateText: method is simple as can be, it just sets the text using the label outlet.
To get rid of the fake view, all we do is remove the view from the view hierarchy using removeFromSuperview:
Go ahead and try it. It actually works, but it's kind of missing something, isn't it? It just appears out of nowhere, and then disappears in the flash of an eye. That's not really the way alerts work on the iPhone, is it? No, they bounce into existence so we notice them, then fade out. Let's add some animation to make it look right, shall we?
When alert views are shown, they bounce into existence. When they are dismissed, they fade away. Both of these are relatively easy to implement using Core Animation.
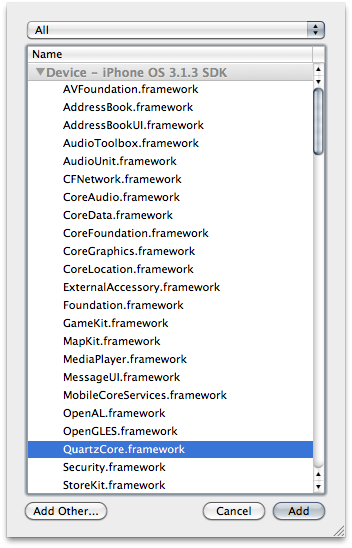
In order to use Core Animation, we actually have to add the QuartzCore framework to our project. The easiest way to do that is to right-click on the Frameworks group in the Groups & Files pane and select Add->Existing Frameworks…. From the dialog that pops up, select QuartzCore.framework.
You'll also need to add an import statement to the top of the controller class so the compiler knows about the Core Animation calls:
To do the bounce animation, add the following bold code to doLongSomething:.
This code basically creates an animation that changes the scale of the view over time. The first array tells the animation what scale value to have at each keyframe, and the second array identifies when (how many seconds into the animation) each of the keyframe falls. If the code doesn't make sense, there are two good books on Core Animation, one by Marcus Zarra and Matt Long, the other by Bill Dudney (now the Frameworks Evangelist at Apple). Both are good books and either one book should help you understand the basic principles used in Core Animation.
To fade the animation out, we have to create another animation, and we also have to change when we remove alertView from the view hierarchy. We can't remove alertView until the animation is complete, or the user won't see the animation. We can get notified when an animation is complete by becoming the delegate of the CAKeyframeAnimation and implementing the appropriate method.
Let's start by replacing the existing finalUpdate method with this new version that simply fades the alert out.
Notice that we've specified self as the delegate. We do this because we want to be notified when the animation is complete so we can remove alertView from the view hierarchy.
Now, we have to implement the delegate method animationDidStop:finished: to do that. Add the following method to the end of CustomAlertViewController.m, right above the @end declaration:
Now you should be able to run it and when you press the button, your custom "alert" should pop in, and then fade-out in a manner very similar to Apple's own alerts. If you didn't feel like following along at home, you can download my Xcode project right here.
Now, you should be very careful about using something like this. You really don't want to annoy your users, so you should only do this when it's absolutely necessary and only show it for short periods of time.
The same basic technique used here can be used any time you want to mimic the appearance of system alerts and dialogs. If I have time, for example, I'd like to go back and change the Tic-Tac-Toe application from More iPhone 3 Development so that the online game picker has a similar appearance to the GameKit peer picker, which can be done with a variant of this technique.
In the simple example we're going to build today, there won't be any interactivity with the alert (such as buttons you can press), but there's no reason why the view you show couldn't have controls that the user can interact with. We will be working with an instance of UIView, so you show anything this way that can be put into a UIView. Which is basically everything.
Create the Xcode Project
If you want to follow along at home, create an Xcode project from the View-based Application project template and called the project CustomAlert.
The Background Image
To start things off, we need a background image. Apple's alerts generally have gloss caustic appearance, but for this exercise, I'm going to mimic Tweetie's translucent black rounded rectangle. I started up Acorn and created a 180 pixel by 180 pixel transparent image. I added a black rounded rectangle with 60% opacity and saved it as a .png file and add it to the Resources group in the Groups & Files pane. If you want to steal mine, you can grab it from here. You can, of course, adjust the appearance of this background image to better match the appearance of your own application.
Once the image is in the Resources folder of our project, we can use it either in code or in Interface Builder. We could do this completely in code, but I hate writing unnecessary code, so let's create the view for the pseudo-alert in Interface Builder.
Declaring Outlets and Actions
Before heading to Interface Builder, we need to declare our outlets in CustomAlertViewContoller.h so that IB can see them. While we're there, let's also declare an action method which will be called when a button is pressed. That's how the user will show the alert in this particular case. We'll also add a method to update the message shown on the view, and another one to dismiss the view. Here's what CustomAlertViewController.h should look like:
Easy enough, right? Make sure you save it before continuing, or IB won't be able to see the actions and outlets.
Building the View in IB
Double-click CustomAlertViewController.xib to launch Interface Builder. First, grab an instance of UIView from Interface Builder's Library palette (⌘⇧L) and drag it to the nib's main window. Do NOT add it to the existing view. Instead, make sure to add it as a root object in the nib. We do not want it to be part of the view hierarchy until we're ready for it, so putting it here will cause the object to exist, but not be visible to the user. At this point, the nib's main window should look something like this:
If you want to rename the new view to differentiate it from the existing view, feel free to do so by single-clicking the new View icon, waiting a half-second or so, then single-clicking on it again, right on the word View. Single-click the new View icon and press ⌘3 to bring up the size inspector, and set the width and height of this view to 180 by 180 pixels (or whatever size image you used if you used a different background image):
If it won't let you change the size of the view, go to the attribute inspector (⌘1) and make sure that Simulated Interface Elements popup menus are all set to read None. If you set any other value for any of those, it will set your view's size for you and will prevent you from changing them using the size inspector. Also, make sure that the Opaque checkbox is not checked, otherwise it will ruin the effect.
Now you can double-click the new view to open it up for editing. First, drag a UIImageView from the Library. Since it's the first item you're adding, it should automatically resize to the view's size, which is what you want. Use the attribute inspector to select the image you added earlier to your Xcode project (alert.png) and make sure that the image view is also not opaque.
Next, add a UIActivityIndicatorView from the Library, centered in the window. Use the attribute inspector to change the style to Large White.
Drag a UILabel from the Library and place it below the activity indicator, centered. Use the attribute inspector to make sure the text is centered also. Double-click the label to change its text to read Doing Something, or whatever other message you feel like typing in.
You'll want to change the font size and color. The color can be changed using the attribute inspector, the size using the text palette (⌘T). I used white Helvetica Bold at 17 points. When you're done, it should look like this:
Making the Connections
Our view is now built, but we have to wire up the outlets and actions before going back to Xcode. In the View's main window, control-drag from File's Owner to the icon called View that was just added. Make sure you don't select the view that existed before (which is why renaming the new one was a good idea). When prompted for an outlet, select the alertView outlet.
Double-click the newer View icon if the view we just built isn't showing, then control-drag from File's Owner to the only label on the view, connecting it to the outlet called label.
Now, we need to add a button to the other View icon, so double-click the existing View icon to open that one up. It should just be an empty gray view, like this:
Drag a Round Rect Button from the Library to this view. Place it in the center of the view and double-click the button to change its title to something that make sense. I called it Do Long Thing, but go crazy if you want.
Now, control-drag from that button you just added back to File's Owner and select the doLongSomething: action.
Save the nib and go back to Xcode. You can quit Interface Builder if you want, we're done with it.
Implementing the Alert
Here is the implementation of CustomAlertViewController. You can replace the template code with this version:
Pretty simple, huh? Let's look at the three custom methods we wrote to make sure we understand what's going on.
Showing the Alert
All we have to do so that the user can see our view is to add alertView to the view hierarchy. We add it as a subclass of the controller's main view. We also set the alert view's background color to clearColor so that the transparent parts don't show up as white. In this example, I also programmatically centered the view in the window. That line of code isn't necessary if you centered the view in IB, however I like to do this programmatically just to ensure it's centered on the screen.
After that, we just have a series of calls at different delay intervals (using performSelector:withObject:afterDelay: to updateText: to change the displayed text, then a final delayed call to finalUpdate to dismiss the fake alert. Essentially, the text will change a few times over the course of five seconds and then the alert will go away.
- (IBAction)doLongSomething
The updateText: method is simple as can be, it just sets the text using the label outlet.
- (void)updateText:(NSString *)newText
To get rid of the fake view, all we do is remove the view from the view hierarchy using removeFromSuperview:
- (void)finalUpdate
Go ahead and try it. It actually works, but it's kind of missing something, isn't it? It just appears out of nowhere, and then disappears in the flash of an eye. That's not really the way alerts work on the iPhone, is it? No, they bounce into existence so we notice them, then fade out. Let's add some animation to make it look right, shall we?
Adding Animation
When alert views are shown, they bounce into existence. When they are dismissed, they fade away. Both of these are relatively easy to implement using Core Animation.
In order to use Core Animation, we actually have to add the QuartzCore framework to our project. The easiest way to do that is to right-click on the Frameworks group in the Groups & Files pane and select Add->Existing Frameworks…. From the dialog that pops up, select QuartzCore.framework.
You'll also need to add an import statement to the top of the controller class so the compiler knows about the Core Animation calls:
To do the bounce animation, add the following bold code to doLongSomething:.
- (IBAction)doLongSomething
This code basically creates an animation that changes the scale of the view over time. The first array tells the animation what scale value to have at each keyframe, and the second array identifies when (how many seconds into the animation) each of the keyframe falls. If the code doesn't make sense, there are two good books on Core Animation, one by Marcus Zarra and Matt Long, the other by Bill Dudney (now the Frameworks Evangelist at Apple). Both are good books and either one book should help you understand the basic principles used in Core Animation.
To fade the animation out, we have to create another animation, and we also have to change when we remove alertView from the view hierarchy. We can't remove alertView until the animation is complete, or the user won't see the animation. We can get notified when an animation is complete by becoming the delegate of the CAKeyframeAnimation and implementing the appropriate method.
Let's start by replacing the existing finalUpdate method with this new version that simply fades the alert out.
- (void)finalUpdate
Notice that we've specified self as the delegate. We do this because we want to be notified when the animation is complete so we can remove alertView from the view hierarchy.
Now, we have to implement the delegate method animationDidStop:finished: to do that. Add the following method to the end of CustomAlertViewController.m, right above the @end declaration:
- (void)animationDidStop:(CAAnimation *)theAnimation finished:(BOOL)flag
Now you should be able to run it and when you press the button, your custom "alert" should pop in, and then fade-out in a manner very similar to Apple's own alerts. If you didn't feel like following along at home, you can download my Xcode project right here.
Note: If you downloaded the code before 2:39 EST and are getting an error, re-download the project. I originally uploaded the wrong version of the code.
0 comments:
Post a Comment