


Well, the NDA has finally lifted, so we can start talking about iPhone SDK 3.2 and the iPad. The logical starting place seemed to be how to convert your existing applications into a "Universal App" that runs natively both on the iPad and the iPhone/iPod touch. Now, a lot of you have likely already had to figure this stuff out so you could get your updated app on the store today, but for those who didn't go the early adopter route, let's take a few minutes to look at the process. It's pretty straightforward but there are a few gotchas.
The first thing you have to do is identify that you want to build your existing application as a universal application. For this article, I'm using the Xcode project from OpenGL ES Particle Generator Application, but I'll try to keep the information general. Note: the following step is not needed if you use Xcode's Update Project Target for iPad option talked about here.
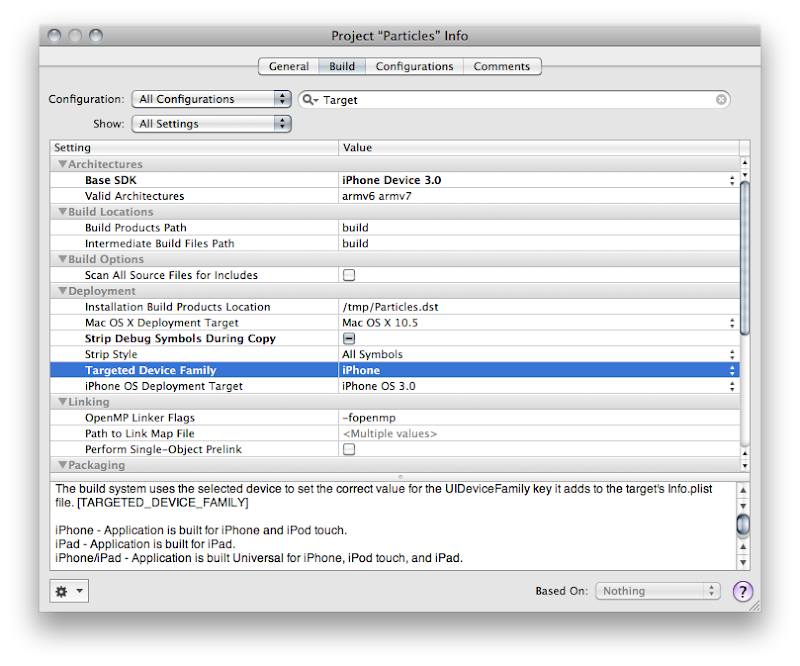
Bring up your Project Info window in Xcode by either double-clicking on your project's root node in the Groups & Files pane or selecting Edit Project Settings from the Project menu and then navigate to the Build tab. Now, the change we're about to make needs to be made to all configurations, so make sure that the Configuration popup menu is set to All Configurations, otherwise you'll only make the change on one configuration.
We need to change a setting called Target Device Family, so type Target into the search bar, or just search for that entry manually (it'll be under the Deployment heading). Right now, it should look like this:
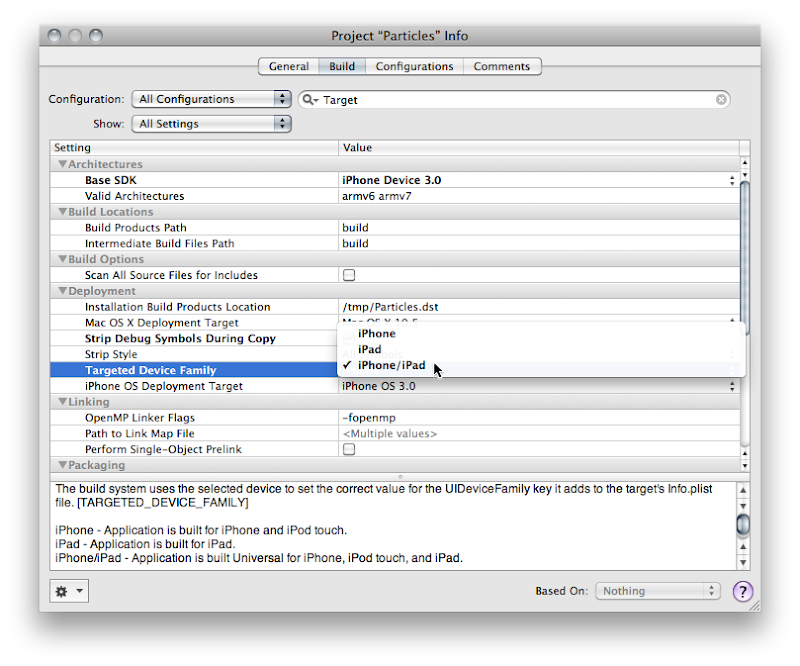
See how it says iPhone? Yeah, you know what to do. Click on it and change it so it reads iPhone/iPad, like so:
Good! now you're done, right? Most likely, no.
The next thing you're going to want to do is audit your application to see if you hard-coded the screen size anywhere in your application. You shouldn't have hardcoded those values, but let's face it, we've all done it. A Project Find (⌘⇧F) for 320 and 480 and that should turn up any of those hardcoded values. In the Particle Generator code, I did it in only one place, in code that creates a UIImage of the OpenGL view. The line of code where I did it looks like this:
Usually, the fix for this will be obvious. Instead of hardcoding, you want to pull the width and height from the OpenGL view. The code where I did it actually exists on the GLView class, so I can fix it like so:
But, what if what you've hardcoded is the actual size of the view? Then you need to pull the size from the main screen instead of the view. That's easy enough to do.
Most likely your application's one instance of UIWindow is contained in your MainWindow.xib file that gets loaded automatically. Most likely, that Window is hardcoded to 320x480. Now, you might think that you can just go into Interface Builder and set the autosize attributes for the window and it will get resized for you at launch. You would be wrong. There is no automatic check to make sure your window is the right size.
You have to make sure that the window is the right size for the device you're running on. There are, basically, two ways of doing that. If your application is such that you just need to resize the window and your autosize attributes will take care of making everything look nice, then you can just handle this programmatically in applicationDidFinishLaunching: by setting the window's size to the size of the screen, less the status bar andy any other objects controlled by the iPhone OS (this is known as the Application Frame). Doing this looks almost exactly like setting the size of the view above:
Now, this is actually a good approach for the Particles application because it has one full-screen view. However, the iPad and the iPhone are really different devices, and there are several UI components available on the iPad that aren't available (at least yet) on the iPhone, such as split views and pop up views. For many applications, especially complex applications using a lot of UIKit views and controls, you're probably going to want to provide completely different NIB file based on which device on which the code is running.
The one really important nib file in every iPhone application is, of course, MainWindow.xib, and there has to be a way to tell your application to use a different MainWindow.xib for different devices. In fact, there is. For each key that Info.plist supports, such NSMainNibFile, which is used to specify the name of the application's main nib file, you can now specify device-specific entries. If you provide a device-specific entry for the device the application is currently running on, it will use the device-specific value, otherwise it will just use the normal value.
Device-specific keys are exactly the same as the original or default key except the key name is followed by a tilde (~) and then the name of the device in all-lowercase letters. So, to tell our application to load a different nib file for the iPad, we can add a key called NSMainNibFile~ipad and then specify the name of the nib file to use when launching on an iPad. For the iPhone and iPod touch, it will continue to use the default value, MainWindow.xib, but for the iPad, it will use the nib file you've specified in the new, device-specific key.
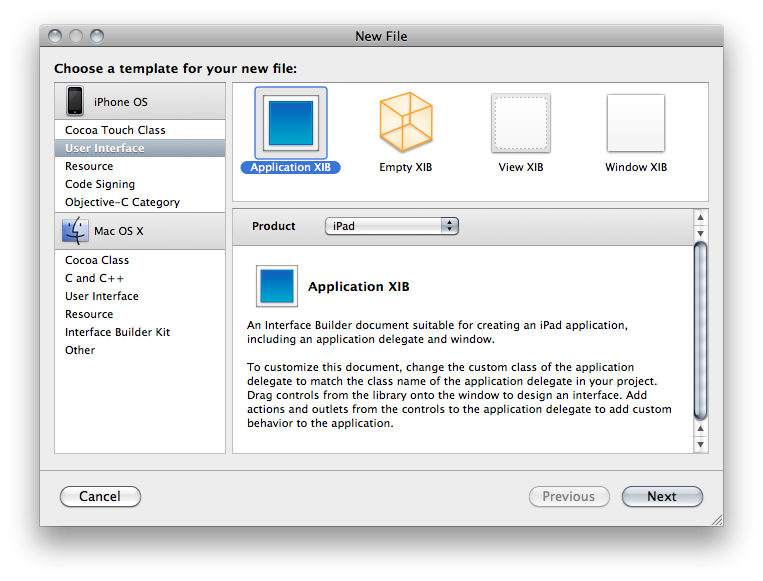
You can add a new version of MainWindow.xib to your project by selecting the Resources group and choosing Add New File from the File menu. From the New File Assistant, select User Interface from under the iPhone OS, then select Application XIB, and make sure you select the right device in the Product drop-down.
Make sure you remember to connect all the outlets and actions in this new nib to the same outlets and actions you used in the other nib. Remember, only one of the application nibs will be loaded, so there's no conflict.
For any key in the Info.plist file, you can use this same technique to override the default value with a device specific. You could, for example, have the iPhone version start in Portrait and the iPad version start in landscape, like so:
If you have code that needs to vary depending on whether it's running on the iPad or iPhone/iPod touch, Apple has provided a new macro called UI_USER_INTERFACE_IDIOM() that will tell you that. There are currently two values defined, UIUserInterfaceIdiomPhone and UIUserInterfaceIdiomPad, and this macro will return the value that corresponds to the device being run. So, for example, if you needed to push a view controller onto the navigation stack, but wanted a different nib used for the iPad than the iPhone, you might do this:
If you need finer-grain control, and need to know exactly which device, there's no official, supported way to determine the exact device. The vast majority of the time you you think you need to know the device, you don't actually need to know the device, you just need to know which features are supported. Even though you can find code around the web that will determine the device based on UIDevice, you really shouldn't base your logic on that because such code can be fragile since you don't know what future devices will exist, or what features they will have.
In cases like the Image Picker, Apple provides a way to determine which features are available on your device, such as whether there's a camera, and whether that camera supports video. When Apple hasn't provide a specific check or test, what you can do is use NSClassFromString(), which (as is probably obvious from the name) creates a Class instance based on the name of a class contained in a string. If this returns nil, then you know the class you're asking about isn't available. You can wrap your code that uses classes that aren't available everywhere in these checks and make code that works correctly on all devices, and will continue to do so in the future (for the most part - it's never possible to 100% future-proof code). Here's an example of checking for the existence of the UISplitViewController, which is a new class only available on the iPad:
You can do something similar with C functions by checking if the function is NULL For example, one of the frameworks added with iPhone SDK 3.2 is CoreText.framework. If we wanted to use the function CTFontCreateWithName() to create a new font using that framework, we could wrap the logic in an interface idiom check, like above, or we could just check to see if the function we want to use exists by seeing if the symbol CTFontCreateWithName is NULL at runtime, like so:
Well, that pretty much covers the basics you'll need to convert your existing iPhone apps to Universal Apps. The more complex your app, the more likely you'll want to consider doing separate iPad and iPhone applications. I'll show how to add another target to your Xcode project so you can generate two applications from the same project in a future post. For many apps, however, this should be enough to get you porting away, so port away!
Note: There are some additional things you should know, so read this post also before tackling your update.
Targeting All Devices
The first thing you have to do is identify that you want to build your existing application as a universal application. For this article, I'm using the Xcode project from OpenGL ES Particle Generator Application, but I'll try to keep the information general. Note: the following step is not needed if you use Xcode's Update Project Target for iPad option talked about here.
Bring up your Project Info window in Xcode by either double-clicking on your project's root node in the Groups & Files pane or selecting Edit Project Settings from the Project menu and then navigate to the Build tab. Now, the change we're about to make needs to be made to all configurations, so make sure that the Configuration popup menu is set to All Configurations, otherwise you'll only make the change on one configuration.
We need to change a setting called Target Device Family, so type Target into the search bar, or just search for that entry manually (it'll be under the Deployment heading). Right now, it should look like this:
See how it says iPhone? Yeah, you know what to do. Click on it and change it so it reads iPhone/iPad, like so:
Good! now you're done, right? Most likely, no.
Auditing for Hardcoded Sizes
The next thing you're going to want to do is audit your application to see if you hard-coded the screen size anywhere in your application. You shouldn't have hardcoded those values, but let's face it, we've all done it. A Project Find (⌘⇧F) for 320 and 480 and that should turn up any of those hardcoded values. In the Particle Generator code, I did it in only one place, in code that creates a UIImage of the OpenGL view. The line of code where I did it looks like this:
CGImageRef imageRef = CGImageCreate(320, 480, bitsPerComponent, bitsPerPixel, bytesPerRow, colorSpaceRef, bitmapInfo, provider, NULL, NO, renderingIntent);
Usually, the fix for this will be obvious. Instead of hardcoding, you want to pull the width and height from the OpenGL view. The code where I did it actually exists on the GLView class, so I can fix it like so:
CGImageRef imageRef = CGImageCreate(self.frame.size.width, self.frame.size.height, bitsPerComponent, bitsPerPixel, bytesPerRow, colorSpaceRef, bitmapInfo, provider, NULL, NO, renderingIntent);But, what if what you've hardcoded is the actual size of the view? Then you need to pull the size from the main screen instead of the view. That's easy enough to do.
UIScreen *screen = ;
;Dealing with Different Window Sizes
Most likely your application's one instance of UIWindow is contained in your MainWindow.xib file that gets loaded automatically. Most likely, that Window is hardcoded to 320x480. Now, you might think that you can just go into Interface Builder and set the autosize attributes for the window and it will get resized for you at launch. You would be wrong. There is no automatic check to make sure your window is the right size.
You have to make sure that the window is the right size for the device you're running on. There are, basically, two ways of doing that. If your application is such that you just need to resize the window and your autosize attributes will take care of making everything look nice, then you can just handle this programmatically in applicationDidFinishLaunching: by setting the window's size to the size of the screen, less the status bar andy any other objects controlled by the iPhone OS (this is known as the Application Frame). Doing this looks almost exactly like setting the size of the view above:
CGRect rect = ;
;Now, this is actually a good approach for the Particles application because it has one full-screen view. However, the iPad and the iPhone are really different devices, and there are several UI components available on the iPad that aren't available (at least yet) on the iPhone, such as split views and pop up views. For many applications, especially complex applications using a lot of UIKit views and controls, you're probably going to want to provide completely different NIB file based on which device on which the code is running.
Info.Plist Device-Specific Entries
The one really important nib file in every iPhone application is, of course, MainWindow.xib, and there has to be a way to tell your application to use a different MainWindow.xib for different devices. In fact, there is. For each key that Info.plist supports, such NSMainNibFile, which is used to specify the name of the application's main nib file, you can now specify device-specific entries. If you provide a device-specific entry for the device the application is currently running on, it will use the device-specific value, otherwise it will just use the normal value.
Device-specific keys are exactly the same as the original or default key except the key name is followed by a tilde (~) and then the name of the device in all-lowercase letters. So, to tell our application to load a different nib file for the iPad, we can add a key called NSMainNibFile~ipad and then specify the name of the nib file to use when launching on an iPad. For the iPhone and iPod touch, it will continue to use the default value, MainWindow.xib, but for the iPad, it will use the nib file you've specified in the new, device-specific key.
You can add a new version of MainWindow.xib to your project by selecting the Resources group and choosing Add New File from the File menu. From the New File Assistant, select User Interface from under the iPhone OS, then select Application XIB, and make sure you select the right device in the Product drop-down.
Make sure you remember to connect all the outlets and actions in this new nib to the same outlets and actions you used in the other nib. Remember, only one of the application nibs will be loaded, so there's no conflict.
For any key in the Info.plist file, you can use this same technique to override the default value with a device specific. You could, for example, have the iPhone version start in Portrait and the iPad version start in landscape, like so:
...
UIInterfaceOrientation
UIInterfaceOrientationPortrait
UIInterfaceOrientation~ipad
UIInterfaceOrientationLandscapeLeft
...Programmatically Determining Device
If you have code that needs to vary depending on whether it's running on the iPad or iPhone/iPod touch, Apple has provided a new macro called UI_USER_INTERFACE_IDIOM() that will tell you that. There are currently two values defined, UIUserInterfaceIdiomPhone and UIUserInterfaceIdiomPad, and this macro will return the value that corresponds to the device being run. So, for example, if you needed to push a view controller onto the navigation stack, but wanted a different nib used for the iPad than the iPhone, you might do this:
MyController *controller = nil;
if (UI_USER_INTERFACE_IDIOM() == UIUserInterfaceIdiomPad)
controller = ;
else
controller = ;
;
;If you need finer-grain control, and need to know exactly which device, there's no official, supported way to determine the exact device. The vast majority of the time you you think you need to know the device, you don't actually need to know the device, you just need to know which features are supported. Even though you can find code around the web that will determine the device based on UIDevice, you really shouldn't base your logic on that because such code can be fragile since you don't know what future devices will exist, or what features they will have.
In cases like the Image Picker, Apple provides a way to determine which features are available on your device, such as whether there's a camera, and whether that camera supports video. When Apple hasn't provide a specific check or test, what you can do is use NSClassFromString(), which (as is probably obvious from the name) creates a Class instance based on the name of a class contained in a string. If this returns nil, then you know the class you're asking about isn't available. You can wrap your code that uses classes that aren't available everywhere in these checks and make code that works correctly on all devices, and will continue to do so in the future (for the most part - it's never possible to 100% future-proof code). Here's an example of checking for the existence of the UISplitViewController, which is a new class only available on the iPad:
Class splitViewController = NSClassFromString(@"UISplitViewController");
if (splitViewController)
You can do something similar with C functions by checking if the function is NULL For example, one of the frameworks added with iPhone SDK 3.2 is CoreText.framework. If we wanted to use the function CTFontCreateWithName() to create a new font using that framework, we could wrap the logic in an interface idiom check, like above, or we could just check to see if the function we want to use exists by seeing if the symbol CTFontCreateWithName is NULL at runtime, like so:
    if (CTFontCreateWithName != NULL)
        CTFontFontRef myFont = CTFontCreateWithName(@"Comic Sans", 14.0, NULL);
Go, Go, Gadget iPad, Go!
Well, that pretty much covers the basics you'll need to convert your existing iPhone apps to Universal Apps. The more complex your app, the more likely you'll want to consider doing separate iPad and iPhone applications. I'll show how to add another target to your Xcode project so you can generate two applications from the same project in a future post. For many apps, however, this should be enough to get you porting away, so port away!
0 comments:
Post a Comment