


The code for this chapter can be found here.I've mentioned OpenGL ES 2.0's programmable pipeline, but it may not be clear to you exactly what that term means. If that's the case, let's clear it up now. The term “pipeline” refers to the entire sequence of events, starting from when you tell OpenGL ES to draw something (usually called rendering), through the point where the objects submitted have been fully drawn. Typically, an OpenGL ES program is repeatedly drawing as the program runs, with each completed image begin referred to as a frame.
Versions of OpenGL ES prior to 2.0 (including 1.1, which is supported by all iOS devices) used what's called a fixed rendering pipeline, which means that the final image was generated by OpenGL ES without any chance for you to do anything. A better term for it might have been “closed pipeline”, because you shove stuff in one end, and it comes out the other end and you have no ability to influence it once it starts going down the pipeline
In the fixed pipeline, the entire image is rendered based on the values you submit to OpenGL ES in your Application's previous API calls. Every time OpenGL ES 1.x renders something, it does so using the same set of algorithms and calculations. If you want a light, for example, you call a handful of OpenGL ES functions in your application code to define the kind of light you want, the position of the light, the strength of the light, and perhaps a few other attributes. OpenGL ES 1.1 then takes the information you've provided and does all the calculations needed to add the light to your scene. It figures out how to shade your objects so that they look like the light is hitting them and draws them accordingly. The fixed pipeline insulates you from a lot of things. It basically says, “Oh, honey… give me the information about your scene, and don't worry your pretty little head about all the math.”
The good thing about fixed pipeline programming is that it's conceptually straightforward and easy. Oh, I know… it doesn't feel easy when you're learning it, but compared to the programmable pipeline, the basic idea is much easier to grasp. Want to set up a view that simulates perspective? OpenGL ES will basically do it for you if you give it a handful of inputs using a couple of API calls. Want to move, rotate, or scale an object? There are functions to do that for you, too. Want to add a light or six to your scene? Just make a few calls per light before drawing, and you're good to go.
The bad thing about the fixed pipeline is that it limits what you can do. A lot of the fancy lighting and texturing effects that you see in modern 3D games, for example, can't be created easily (or at all) using the fixed pipeline. With the fixed pipeline, you're only able to do what the authors of the graphics library anticipated you might need to do, in the way they anticipated you would need to do it. Want a lens flare or depth of field? Well, you can probably figure out a way to do these kinds of things using the fixed pipeline, but it won't be easy or straightforward. People have come up with some really ingenious workarounds to outwit the limitations of the fixed pipeline, but even if you do manage to find a way to work around the limitations of the fixed pipeline to achieve some effect, your code's likely to be a bit of a hack---and more importantly, some of the code you write to implement that functionality is probably going to be running in the wrong place for best performance. Let's talk about why that is, because it's a critical piece of information once we start working with the programmable pipeline.
Hardware Architecture
OpenGL ES insulates you from having to code to any specific hardware, but it's important to understand, at least at a very high level, how iOS devices calculate and display graphic content. Every iOS device ever made has two processors inside of it. They all have a general purpose processor called the CPU, as well as a second processor called a GPU, which stands for graphics processing unit.¹The CPU can do most anything you need it to do, and it's where your application's code primarily runs. The CPU is very fast at doing integer operations, but not anywhere near as fast when it comes to doing floating point operations². The GPU, on the other hand, is much more specialized. It's good at doing large numbers of small floating point calculations very quickly. It was designed to work as a helper to the CPU to handle those tasks that the CPU isn't particularly good at, rather than serving as a standalone processor. The CPU, in essence, hands off certain tasks that the GPU is better at performing. With the two processors working in parallel, the device is capable of doing a lot more work at one time. But this “helping” doesn't happen automatically in your programs.When you write C, Objective-C, or C++ code in Xcode, the compiled binary code executes on the CPU. There are some libraries, such as Core Animation, that implicitly hand off tasks to the GPU on your behalf, but generally speaking, you have to use special libraries to get access to the GPU. Fortunately, OpenGL ES, is just such a library. Both with the fixed pipeline and the programmable pipeline, most of the OpenGL ES rendering happens on the GPU. That makes make sense, if you think about it: calculations for graphics are what the GPU was designed to do (hence the “G” in GPU). Much of OpenGL ES 2.0's pipeline, like all of the fixed pipeline, is outside your control. There are, however, two specific places where you can (and, in fact, must) write code. The code you write runs on the GPU and can't be written in Objective C, C, or C++. It has to be written in a special language specifically designed for the purpose. Programs that you write for the programmable pipeline run on the GPU and are called shaders. The language you write shaders in is called GLSL, which stands for GL Shading Language.
The term shader is another example of nonintuitive naming in OpenGL. Shaders are nothing more than small pieces of executable code that run on the GPU instead of the CPU. Among the tasks they perform is the calculation of the shading (or color) of each pixel that represents a virtual objects, but they can do far more than that. Shaders are fully fledged programs written in a Turing-complete programming language.
OpenGL ES Shaders
There are two types of shaders that you can write for OpenGL ES: vertex shaders and fragment shaders. These two shaders make up the “programmable” portion of the OpenGL ES 2.0 programmable pipeline. The GLSL language that you program these shaders with uses a C-like syntax. We'll look at a few simple examples of GLSL in this chapter, and we'll work with it extensively throughout the rest of the book.An important thing to realize about shaders is that they are not compiled when you build your application. The source code for your shader gets stored in your application bundle as a text file, or in your code as a string literal. At runtime, before you use the shaders, your application has to load and compile them. The reason for this deferred compilation is to preserve device independence. If shaders were compiled when you built your application and then Apple were to change to a different GPU manufacturer for a future iPhone release, the compiled shaders very well might not work on the new GPU. Deferring the compile to runtime avoids this problem, and any GPU---even those that don't exist when you create your application---can be supported fully without a need to rebuild your application.
Vertex Shaders
The shader that runs first in the OpenGL ES pipeline is called the vertex shader because it runs once for every vertex that you submit to OpenGL ES. If you submit a 3D scene with a thousand vertices, the vertex shader will get called a thousand times when you submit that scene to OpenGL ES to be drawn, once per vertex. The vertex shader is where you do what OpenGL ES imaginatively calls vertex processing. It's where you handle moving, scaling, or rotating objects, simulating the perspective of human vision, and doing any other calculation that affects vertices or depends on some piece of data that you have on a per-vertex basis.Shaders do not have return values, but both vertex and fragment shaders have required output variables that you must write a value to before the end of the shader's main() function. These output variables essentially function as required return values. For the vertex shader, the required output is the final position for the current vertex. Remember, the shader gets called once for each vertex, so the output of the shader is the final position of the vertex the shader is currently running for. In some cases, it may just be the vertex's original value, but more often than not, each vertex will be altered in some way. Doing calculations on vertices to scale, rotate, or move an object is something the GPU is much better at than the CPU, so typically, we don't try to implement those kinds of calculations in our application code, but instead do them here in the vertex shader. Once your shader has calculated the final position for a given vertex, it needs to set a special output variable called gl_Position. If your vertex shader doesn't write to gl_Position, it results in an error.
There's a slight catch, however. The gl_Position variable is a vec4 variable, which stands for vector 4. The vec4 is a datatype that contains four floating point values. You probably remember that in a Cartesian coordinate system, we use three values (X, Y, Z), not four, so it would seem like the required output should be a vec3, which contains three floating point values just the Vertex3D struct we've wrote last chapter. The first three values in gl_Position represent the Cartesian X, Y, and Z values for the current vertex. The fourth value is typically called W. Don't worry too much about why there's an extra component. It will become important a few chapters from now when we start talking about something called matrix transformations, but for now, just think of W as a work value (that's not actually what it stands for, though) that we'll need in order to do certain calculations to manipulate our vertices. Unless you know w should be set to a different value, set it to 1.0.
Here is an extremely simple example of a vertex shader:
void main()
{
    gl_Position = vec4(0.0, 0.0, 0.0, 1.0);
}
All this shader does is move each vertex to the origin. The function vec4() is built into GLSL, and all it does is create a vector datatype with four members. We're using it to create a vertex at the origin (0,0,0) with a w value set to 1.0. By assigning a value to gl_Position, we are indicating the final position of the current vertex. This is not, perhaps, a very practical fragment shader example — any model you submit to this shader will get turned into a dot at the origin — but it is a simple one that illustrates how you set the final value of the vertex, which is the one task every vertex shader must do every time it runs.
We'll be doing a lot of work with vertex shaders throughout the book; don't worry if you don't fully understand them yet. It's a complex topic, but they'll start to make sense once you've used them. For now, the important points to remember about vertex shaders are:
- Vertex shaders run once for every vertex that OpenGL ES draws.
- Vertex shaders must set gl_Position to indicate the location of the current vertex using Cartesian coordinates (x,y,z), along with an additional value called W. For the time being, we'll always set W to to 1.
Fragment Shaders
The second programmable part of the OpenGL ES 2.0 programmable pipeline is called a fragment shader, and it's called that because, well… the fragment shader runs once for every fragment in the drawing operation. That's probably not very helpful, huh? So… what's a “fragment”?Think of a fragment as a possible drawn pixel. A fragment includes all of the various things in the virtual world that could potentially affect one pixel's final color. Imagine that an OpenGL ES view on your iPhone or iPad's screen is a window into a virtual world. Now pick a single pixel in your OpenGL view. If you were to take a slice of your virtual world starting with that pixel, and moving into the virtual world as far as the eye can see, everything that lies behind that one pixel constitutes the fragment for that pixel. Sometimes you'll see fragment shaders called pixel shaders. This is actually a bit of a misnomer, but it's helpful for visualizing a fragment.
Like vertex shaders, fragment shaders have a required output, which is the final color of the pixel that corresponds to the current fragment. You indicate the pixel's color by setting a special GLSL variable called gl_FragColor. Here is the simplest possible fragment shader; it just sets the fragment's color to an opaque blue:
void main()
{
    gl_FragColor = vec4(0.0, 0.0, 1.0, 1.0);
}
Colors, as we saw in the last chapter, are represented by four components in OpenGL ES (red, green, blue, and alpha), and OpenGL ES expects those components in that specific order. GLSL doesn't have a datatype specifically designed for holding colors. Instead, it uses the same datatype it uses for vectors and vertices, so by building a vec4 (a vector datatype with four floating point members) with these four values, we are creating a color in which red and green are set to zero, and blue and alpha are set to one, which is an opaque blue. By assigning that value to gl_FragColor, we're telling OpenGL ES how to draw the pixel that corresponds to this fragment.
You might expect this fragment shader to create a view that's filled entirely with blue, but that's not necessarily what it does. Understanding this will help you understand the difference between a fragment and a pixel. Each frame starts empty, with the background set to a specific color — often black, but it can be set to any color. The vertex data (and other data) describing the scene to be drawn are submitted to OpenGL ES, and a function is called to kick off the rendering pipeline. If there's nothing in the virtual world that can affect a particular screen pixel, the fragment shader doesn't run for that pixel; it just gets left at the background color. This is the reason the term “pixel shader” is not technically correct: a pixel with no corresponding fragment doesn't get processed by the shader. A fragment has one and only one pixel, but a pixel doesn't necessarily have to have a fragment.
What the fragment shader above does is set any pixel that has part of one or more virtual objects “behind” it (so to speak) to blue. That's probably a little confusing, but it will become clear when we write our first OpenGL ES application in the next chapter. For now, the points to remember about fragment shaders are the following:
- Fragment shaders run once for every fragment, which means once for every pixel in which something can potentially be drawn.
- Fragment shaders must set gl_FragColor to indicate the color that the fragment's pixel should be drawn.
Sending Data to the Shaders
Shaders do not have access to your application's main memory. Any data that a shader needs to do its job has to be specifically sent over to the GPU from your application code. Sending this data incurs overhead and can be a bottleneck in the rendering pipeline. In order to keep rendering performance up, it's important to only send the data that your shaders need. There are two types of data you can send from your application code to your shaders: attributes and uniforms.Attributes
An attribute is data for which you have one distinct value for each vertex being submitted. If, for example, you are submitting a scene with a thousand vertices, any attributes you pass must contain a thousand values. If you have an attribute of colors, you must pass in a thousand colors. If you have an attribute of vectors, you must pass in a thousand vectors. You will virtually always have at least one attribute, containing the Cartesian coordinates of each vertex to be drawn or, at least, the starting position of each vertex before it gets transformed by the vertex processor. Without this data, there's really no way to do anything in your vertex shader. You can only submit floating point data in an attribute, not integer data, though you can provide multiple floating point values to each vertex in a single attribute. A color, for example, contains four floating point numbers, so to provide data for color attribute, you need to provide an array containing 4 floats multiplied by the number of vertices being submitted. That same attribute will comes into the shader as a single vec4.Each time your vertex shader runs, the pipeline will provide it with just the value that corresponds to the vertex that the shader is executing for. So, in your application code, attributes are represented by an array with one or more values for each vertex, but in your vertex shader, you must deal with only a single chunk of data from that submitted array, which contains the values that correspond to the current vertex. We'll see how to send attributes from your application to the shader a little later in the chapter, but here's how you work with an attribute insode your vertex shader:
attribute vec4 position;

void main()
{
    gl_Position = position;
}
It's pretty straightforward; you declare the attribute at the top of the shader, and that's pretty much all you have to do in on the shader side. The OpenGL ES pipeline takes care of handing your shader the right data element each time. That means you can treat the attribute (position, in this case) as an input variable, almost like an argument to a function. In this example, we're taking the value from the position attribute for this vertex and assigning it as-is to the special gl_Position output variable. In this case, our final position for each vertex is the starting position that was supplied to us by our application code. We'll see how to send attributes from our application code a little later in this chapter - there's some other information we need to go over before it will make sense.\
Uniforms
Uniforms are the second kind of data that you can pass from your application code to your shaders. Uniforms are available to both vertex and fragment shaders — unlike attributes, which are only available in the vertex shader. The value of a uniform cannot be changed by the shaders, and will have the same value every time a shader runs for a given trip through the pipeline. Uniforms can be pretty much any kind of data you want to pass along for use in your shader.We'll look at how to pass uniforms from your application code a little later, but in your shader, working with a uniform is just like working with an attribute. You declare it at the top and then treat it as an input value in your code, like so:
attribute vec4 position;
uniform float translate;

void main()
{
    gl_Position = position;
    gl_Position.y += translate;
}
In this example, we're passing a floating point value called translate, then using it to modify the gl_Position output variable, moving the vertex along the Y axis based on the value of the translate uniform. NB: This is not how you would normally move an object in your shader. This is just a simple example to illustrate how uniforms work.
Varyings
Since attributes are only available in the fragment shader and the value of uniforms can't be changed, how can the fragment shader know what values to use when drawing a given pixel? Let's say, for example, that we have an attribute containing per-vertex colors. In order to be able to determine the final pixel color in our fragment shader, we would need access to that particular piece of per-vertex information, wouldn't we?
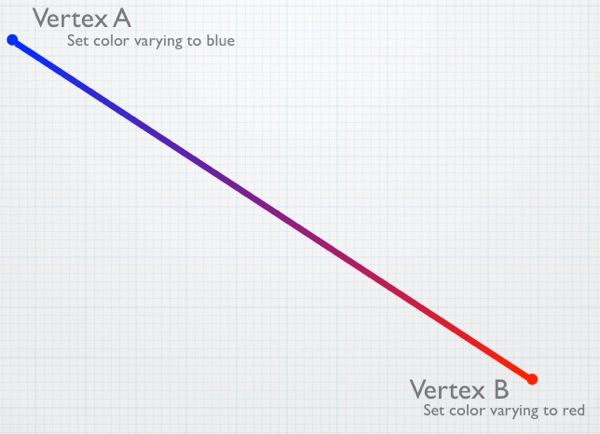
Why, yes, we would. And that's where something called a varying comes into play. Varyings are special variables that can be passed from the vertex shader to the fragment shader, but it's cooler than it sounds. There is no set relationship between vertices and fragments. So, how can a value from the vertex shader be used later in the fragment shader? How does it figure out which vertex's value to use? What happens with varyings is that the value set in the vertex shader is automatically interpolated for use in the fragment shader based on the fragment's pixel's relative distance from the vertices that affect it. Let's look at a simple example. Say we're drawing a line:

A varying set in the vertex shader for V1 and V2 would have a value halfway between those two values when the fragment shader runs for fragment F. If the varying color was set to red in the vertex shader for V1 and to blue in the vertex shader for V2, when the fragment shader for the fragment corresponding to the pixel at F runs and reads that varying, it will contain neither blue nor red. Instead, it will have a purple color, halfway between red and blue because that fragment is roughly halfway between those two vertices. The pipeline automatically figures out which vertices affect the drawing of a given fragment and automatically interpolates the values set for the varyings in the vertex shaders based on the relative distances of the fragment from those vertices.

Variables are easy to use: you just declare them in both shaders. Then any value you set in the vertex shader will be available, in interpolated form, in the fragment shader. Here's a very simple example of a vertex shader that assigns a value from a per-vertex color to a varying:
attribute vec4 position;
attribute vec4 color;

varying vec4 fragmentColor;

void main()
{
    gl_Position = position;
    fragmentColor = color;
}
In this example, color is the color for this vertex that was passed in from our application code. We've declared a varying called fragmentColor to let us pass a color value to the fragment shader. We've declared it as a vec4 because colors are comprised of four component values. In addition to setting gl_Position based on the vertex's position value that was passed into the shader using the position attribute, we also assign the value from the color per-vertex attribute to the varying called fragmentColor. This value will then be available in the fragment shader in interpolated form.
Here's what a simple fragment shader using that same varying would look like:
varying lowp vec4 fragmentColor;

void main()
{
    gl_FragColor = fragmentColor;
}
The declaration of the varying in the fragment shader has the same name (fragmentColor) as it did in the vertex shader. This is important; if the names don't match, OpenGL ES won't realize it's the same variable. It also has to be the same datatype. In this case, it's vec4, just like it was in the vertex shader. Notice, however, that there's an additional keyword, lowp. This is a GLSL keyword used to specify the precision or, in other words, the number of bytes used to represent a number. The more bytes used to represent a number, the less problems you'll have with the rounding that necessarily happens with floating point calculations. Depending on the amount of precision you need, you can specify lowp, mediump, or highp to indicate how many bytes will store the floating point value while it's being used in the shaders. The actual number of bytes used to represent a variable is decided by OpenGL ES, but the precision keyword lets you give it a hint about how much precision you think this variable needs in this situation.
GLSL allows the user of precision modifiers any time a variable is declared, but this is the one place where it is required. If you don't include it when declaring varyings in your fragment shader, your shader will fail to compile. In other places, the precision modifier is optional and the GLSL specification lays out a set of rules that will be used to determine the precision when no explicit modifier is provided.
The lowp keyword is going to give the best performance but the least accuracy during interpolation. It is often the best choice for things like colors, where small rounding errors won't really matter. When in doubt, start with lowp. You can always increase the precision to mediump or highp if the lack of precision causes problems in your application.
All we do with the value from fragmentColor, which is the interpolated version of the color values set in the vertex shader, is assign it to gl_FragColor so that the pixel gets drawn in the interpolated color. This creates a gradient between the vertices if those vertices aren't the same color.
Before we look at how to pass attributes and uniforms to the shader from our application code, we first need to talk about how shaders get loaded and compiled, because the way we pass data in relies on that mechanism. Let's look at that now; then we'll return to attributes and uniforms from the other side of the pipeline.
OpenGL ES Programs
Shaders always work in pairs in OpenGL ES. At any given moment, there can only be one active vertex shader and one active fragment shader, and when you tell OpenGL ES to draw something, an active vertex and fragment shader must already be in place. Even though only one shader pair can be active at any given moment, you can have different shader pairs for drawing different objects. This allows you to, for example, apply different lighting or different effects to objects in the same scene.OpenGL ES has a concept called a program that combines a vertex shader and fragment shader along with their attributes into a single OpenGL ES object. You can create as many of these programs as you want, but only one of them can be active at any specific time. If you make a program active, the program that was previously active becomes inactive. Typically, programs are created and the shaders loaded and compiled when your application starts, or at some other time before you actually being drawing, such as when loading a level in a game. You don't want to wait until you need the shader to load and compile it because doing so can be a costly operation that would cause a noticeable hiccup in the drawing process.
Loading programs and getting them ready to use is a bit of an involved process. Here is the basic flow:
- Create and compile the shaders. The following steps must be performed twice---once for the vertex shader, and again for the fragment shader:
- Load the shader source code into memory.
- Call glCreateShader() to create an empty shader object, saving the returned value to refer to this shader in future calls.
- Use glShaderSource() to pass the newly created shader object its source code.
- Call glCompileShader() to compile the shader.
- Use glGetShaderiv() to check the compile status and make sure that the shader compiled correctly.
- Call glCreateProgram() to create an empty program and save the returned value so that you can use the program in future calls.
- Attach the two shaders to the program using glAttachShader().
- Delete the shaders using glDeleteShader(). The program will have made its own copy of the shaders, so deleting them doesn't prevent the program from working.
- Bind each of the vertex shader's attributes to the program using glBindAttribLocation().
- Link the program using glLinkProgram().
- When you want to use this program for the first time, or if you want to change the active program to this program, call glUseProgram().
- When you're done with a program, get rid of it using glDeleteProgram().
The following is an example of a fairly typical OpenGL ES program loading code for iOS 4. Don't worry too much about what this is doing, just scan it over and and shake your head a little:
GLuint program;
GLuint vertShader;
GLuint fragShader;
GLint status;
const GLchar *source;
NSString *vertShaderPathname = ;
source = (GLchar *);
if (!source)
vertShader = glCreateShader(GL_VERTEX_SHADER);
if (status == 0)
NSString *fragShaderPathname = ;
source = (GLchar *);
if (!source)
fragShader = glCreateShader(GL_FRAGMENT_SHADER);
if (status == 0)
if (status == 0)
return NO;
if (vertShader)
if (fragShader)
That's pretty ugly, isn't it? It's not much fun to write, either. Fortunately, we can simplify the process quite a bit by creating our own Objective-C wrapper class to represent OpenGL ES programs. Instead of stepping through the code above and examining it, let's package that same functionality up into a more reusable form and discuss that, instead. Doing so kills two birds with one stone: it allows us to step through and understand the process involved in creating programs in OpenGL ES, and makes our lives easier down the road by saving us from having to write nasty code like that every time we need to create a program.Writing the GLProgram class
Open up Xcode or a text editor and create two empty text files. Call one of them GLProgram.h and the other GLProgram.m. We'll be using this class in every one of the projects we create in this book, so make sure to save the two files somewhere you can find them easily. Or, if you prefer, copy my version from the code folder that came with the book.Put the following code in GLProgram.h:
Take a look at the header file we just created; notice that we haven't created any properties, and we don't have any instance variables in our header. We haven't exposed anything here because there shouldn't be any need for other classes to have direct access to any of our instance variables. Everything the program needs to do should be handled using the various methods on our GLProgram object.
New Objective-C Features
Because this book focuses on iOS 4, I'm using a lot of newer functionality in Objective-C 2.0 & 2.1. One instance is in GLProgram: I've used Objective-C's new ability to declare instance variables in a class extension. This allows me to have private instance variables that aren't advertised to other classes because they aren't contained in my class' header file. This feature is not available on the iOS prior to the 4.0 SDK, however, so if you try to use some of the code samples from this book in older versions of the SDK, you may get compilation issues. If you run into this problem, copy the instance variable declarations from the class extension into the class's header file.The first method in our class is our initialization method. It takes the name of the file containing the vertex shader source code and the name of the file that contains the fragment shader source code as arguments. This method loads the source and compiles both shaders as part of initializing the object.
After that, we have the method that will be used to add attributes to our program, followed by two methods that can be used to retrieve the index values for a given attribute or uniform. These index values are used to submit data to the shaders and can be retrieved any time after the program is linked. All of the program's attributes must be added to the program before linking.
The next method we declare, link, is similar to the linking that happens after you compile your application's source code. Xcode handles compiling and linking as a single step when you build your application, but with shaders, it's a necessary, separate step that links all the various components together and gets them ready to use. We couldn't link right after we compiled the shaders because OpenGL needs to know about the program's attributes before it can link properly.
The use method is called when we want to draw using this program's shaders. You can call this method repeatedly, allowing you to switch between shaders at runtime.
The final three methods are primarily for debugging purposes. Since shaders are compiled at runtime, not build time, a syntax error or other problem in a shader won't cause our application build to fail in Xcode, but it will cause the shader compile and/or the program link to fail at runtime. If the link method returns NO, these three methods are how we can find out what went wrong so we can fix it.
Make sure you save GLProgram.h, then switch over to the other text file that you named GLProgram.m and put the following code in it (or you can just copy mine out of the book's source code folder):
typedef
typedef
Let's take this piece by piece and make sure we're clear on what it's doing. The first section might seem a little confusing. We've defined two datatypes to represent function pointers:
typedef
typedefWhile writing the code for the three log methods, it became clear that all three methods were nearly identical. The two shader logs were exactly the same except for the value passed into the two OpenGL ES functions. The program log file had almost identical logic, except it used two different OpenGL ES API calls to retrieve the log data. However, those functions had exactly the same arguments in both cases. This allows us to write a generic method to handle all three types of log by accepting function pointers as a parameter, shortening the code, and making it easier to maintain---since the log logic wouldn't have to be repeated. These type definitions make the code with function pointers easier to read.
Next, we use an Objective-C extension to declare the instance variables and two private methods two methods. The first instance variable we have is a mutable array that will be used to keep track of the program's attributes. There's no reason to keep track of varyings or uniforms. The varyings are strictly between the two shaders, and declaring a varying in both shaders is all that's required to create it. We also don't need to keep track of uniforms because OpenGL ES will assign each of the uniforms an index value when it links the program. With attributes, however, we have to come up with an index number for each one and tell OpenGL ES what index number we're using for which attribute when we bind them. OpenGL ES doesn't assign attribute indices for us for the attributes. Sticking the attributes into an array and using the index values from the array is the easiest way to handle that task in Objective-C, so that's what we're doing.
After the array, we have three GLuints. These are for keeping track of the numbers that OpenGL ES will assign to uniquely identify our program and its two shaders.
Then we have two private methods, which are methods that will be used within this class, but that code outside of this class should never need access to. One is a method that compiles a shader. Since the process of compiling a fragment shader and a vertex shader is exactly the same, we create one method to do them both. The second method is the generic log method mentioned earlier that is used by the three public log methods.
After that, we have a init method. This method takes the name of the two shaders (without the file extension), loads and attempts to compile both of them, and then creates a program to hold them. Once it has a program, it attaches the two shaders to the program and returns the initialized object. It also creates the mutable array that will be used to hold the attribute information. If the shaders fail to compile, it still returns a valid object. If we were to release the object and return nil, we would have no way to get to the log data that tells me what went wrong. By returning a valid object when the shader compile fails, the link step will fail and return NO, which will be the calling code's indication that something went wrong and the logs should be checked.
- (id)initWithVertexShaderFilename:(NSString *)vShaderFilename
fragmentShaderFilename:(NSString *)fShaderFilename
To actually load and compile the shaders, the init method calls the next method in the file twice, once for each shader:- (BOOL)compileShader:(GLuint *)shader
type:(GLenum)type
file:(NSString *)file
The file containing the shader source is loaded from the application bundle. If the method is unable to load the specified file, it returns NO. If it was able to get the shader's source, then it uses OpenGL ES API functions to create a shader, give the newly created shader the loaded source code, and then compile it. After compiling, the compile status is checked and a value returned based on whether the shader was successfully compiled.Once a GLProgram instance has been created and initialized, the next thing that we need to do is to tell it what attributes the vertex shader uses. The next method in the file is used for that purpose:
- (void)addAttribute:(NSString *)attributeName
This method checks to make sure the attribute hasn't already been added to the attributes array before adding it, since attributes must have unique names. It also calls glBindAttribLocation() to let OpenGL ES know about the attribute. Remember: OpenGL ES needs to know about every attribute before we link the program, and this is how we do that. Attributes are identified by their index numbers, and we specify the index number from my array when we call glBindAttribLocation(). That ensures each attribute has a unique index value. The traditional approach to attributes is to create an enum for each of the attributes to be used, but our approach makes the code a little more readable and the program functionality more self-contained.
Uniforms don't need to be kept track of or added before linking. OpenGL will assign each uniform an index without the input. When the shaders are compiled, OpenGL ES will discover the uniforms. When we link the program, OpenGL ES will assign each of the uniforms used in the shaders an index value.
Attributes and Uniform Indices
Why do attribute indices have to be specified before linking, but uniform indices are assigned by OpenGL ES without any input? I don't know. As far as I've been able to discover, the reason for the difference is not specifically documented.
I have a theory, however, that it may be due to the way attributes and uniforms are stored. All attributes take up at least the space of a vec4. That means, if you have an attribute that contains a single floating point value for each vertex, it's still going to take up the same amount of register space on the GPU as an attribute that contains four floating point values for each vertex.
Uniforms, on the other hand, are packed more efficiently into the register space available on the GPU. If we have four float uniforms, for example, they will be packed together into a single register. To do this, OpenGL ES may have to reorder the uniforms to make the most efficient use of the available space.
It seems likely that since attributes won't be packed and therefore won't be reordered during the build phase; as a result, OpenGL ES can let us choose our index values for attributes. However, OpenGL ES takes on the responsibility of assigning the values for uniforms so it can make the best use of the available register space.
You can read more about the way GLSL works by reading the GLSL specification for OpenGL ES (which is different than the GLSL specification for regular OpenGL) here:
Information specifically about uniform packing can be found in Appendix A, part 7.
The next two methods simply return the index number for a given attribute or uniform. For the attribute, it will return the index from the array because that's what we told OpenGL ES to use when we called glBindAttribute(). For uniforms, we have to ask OpenGL ES to give us the index value it assigned at link time. Note that both of these methods involve doing string compares, so if possible, they should be called only once. The controller class that creates the instance of GLProgram should probably keep track of the values returned from attributeIndex: and uniformIndex:. String lookups are costly enough that doing them a few hundred times a second could have a noticeable impact on drawing performance.
- (GLuint)attributeIndex:(NSString *)attributeName
- (GLuint)uniformIndex:(NSString *)uniformName
Next up is the method that gets called to link the program after the attributes have been added. It links and validates the program, then retrieves the link status. If the link failed, we immediately return NO. If the link operation happened successfully, we delete the two shaders and then return YES to indicate success. The reason we don't delete the shaders when the link fails is so our object will still have access to the shader logs, and we can debug if anything goes wrong. Once a shader is deleted, its log are gone as well.
- (BOOL)link
The method to make this program the active one is called use, and it does nothing more than call a single OpenGL ES method, passing in program:
- (void)use
The next four methods are the log methods. As I mentioned earlier, we have one private method that handles the functionality, and that method is called by the three public method. The way you get logs from OpenGL ES is a little old school. No, it's a lot old school. It's practically medieval. We have to first ask OpenGL ES to tell us how long the specific log we're interested is, then allocate a buffer to hold that much data, then retrieve the long into that buffer. In our case, we then turn those characters into an NSString and free() the buffer before returning the NSString instance with the log data:
- (NSString *)logForOpenGLObject:(GLuint)object
infoCallback:(GLInfoFunction)infoFunc
logFunc:(GLLogFunction)logFunc
The next three methods are the public log methods, and they all just call the private method above:
- (NSString *)vertexShaderLog
- (NSString *)fragmentShaderLog
- (NSString *)programLog
Finally, we have our dealloc method, which releases the mutable array, then checks the two shaders and the program, and if any of them are non-zero, that means there's an OpenGL ES object that needs to be deleted, so we delete them.
- (void)dealloc
Got all that? Good. Now you can forget most of it. You need to remember what programs, shaders, attributes, and uniforms are and how they relate to each other, but you can forget about the nitty-gritty details of creating programs.
Using GLProgram
Using the GLProgram object we just created is relatively easy. You first allocate and initialize an instance by providing the names of the two files containing the shaders' source code, leaving off the .vsh and .fsh extensions.
GLProgram *theProgram = [[GLProgram alloc] initWithVertexShaderFilename:@"Shader"
fragmentShaderFilename:@"Shader"];
Next, add any attributes used in your shader to the program. If you had two attributes, one with the position of each vertex called position, and one with a color for each vertex called color, your code to add attributes would look like this:
[program addAttribute:@"position"];
[program addAttribute:@"color"];
After you add the attributes, link the program. If the program is unable to successfully link, it will return NO and you should dump the logs to the console so you can debug the problem. Once you've dumped the logs, it's a good idea to release the program in order to free up the memory they were using, and so you don't try to use an invalid program:
if (![program link])
{
NSLog(@"Link failed");
NSString *progLog = [program programLog];
NSLog(@"Program Log: %@", progLog);
NSString *fragLog = [program fragmentShaderLog];
NSLog(@"Frag Log: %@", fragLog);
NSString *vertLog = [program vertexShaderLog];
NSLog(@"Vert Log: %@", vertLog);
[program release];
program = nil;
}
If the link process was successful and returns YES, retrieve the uniform and attribute indices and then call use to start using the shaders in this program to draw objects:
GLuint positionAttribute = [program attributeIndex:@"position"];
GLuint colorAttribute = [program attributeIndex:@"color"];
GLuint translateUniform = [program uniformIndex:@"translate"];
[program use];
Once you've called use, you're ready to start submitting uniform and attribute data.
Sending Attributes and Uniforms to the Shaders
We're almost ready to try out the OpenGL ES programmable pipeline by writing our first complete OpenGL ES application, but before we do that, we need to talk about how we actually ship the attributes and uniforms over to the shader. It's actually a straightforward process, although it can look intimidating when you first see it in code. The process for attributes and uniforms are slightly different, so we'll look at them individually.Submitting Uniforms
Let's look at uniforms first because they're a little easier to grok. After we link our program, we retrieve the index value for each of our uniforms and save that index value so we can use it to submit the data for that uniform to OpenGL ES:GLuint translateUniform = [program uniformIndex:@"translate"];
Once we have the index value (translateUniform in the previous line of code), we just have to use a function called glUniform() to submit the data for that uniform to our shaders. glUniform() is one of those “alphabet soup” functions that comes in many different forms. Because the shaders run on the GPU, and the GPU deals primarily with floating point numbers, all of the glUniform() variants take one or more GLfloats or one or more pointers to GLfloats.³ To send a single floating point value as a uniform, for example, we'd select either glUniform1f() or glUniform1fv(), depending on whether we needed to send a GLfloat or a pointer to a GLfloat. If we wanted to send a single vertex, which would be represented by a vec3 in the shader, we'd choose either glUniform3f() or glUniform3fv().
Regardless of which of the glUniform() variants we choose, the first argument we pass needs to be the index of the uniform we're submitting data for, which is the value we earlier retrieved from uniformIndex:. When using the non-pointer variants of glUniform() (the ones with a name ending in f), the uniform index is followed by the data being submitted in the proper order. If we need to submit a vertex's location, for example, we would submit the value for X as the second argument, the value of Y as the third argument, and the value of Z as the fourth argument. So, to pass a single non-pointer value using glUniform(), we would do this:
glUniform1f(translateUniform, 25.3f);
To pass a vertex with three values to a uniform, we'd do something like this:
glUniform3f(vectorUniform, 2.3f, -1.34f, 0.34f);
When using the glUniform() variants that end in v, we follow the uniform's index with the size of the data being passed and then a pointer to the actual data, like so:
GLfloat vertex[3];
vertex[0] = 2.3f;
vertex[1] = -1.34f;
vertex[2] = 0.34f;
glUniform3fv(vectorUniform, 1, vertex);
In effect, this code is exactly identical to the previous example, but we're using one of the pointer variants of glUniform() to pass all three values of the array that will make up the vec3 uniform. The gotcha here is the size argument. You might think you should pass 3 in the above example because the vertex array has a length of three, but because we're using glUniform3fv(), we specify 1 because that method assumes that each data element is already three GLfloats long. If they were shorter, you'd be using glUniform2fv() or glUniform1fv().
Submitting Attributes
Sending attribute data to the shader is only slightly more involved than submitting uniforms. First, you have to retrieve the index value for the attribute, like so:GLuint positionAttribute = [program attributeIndex:@"position"];
Just like with uniform indices, you'll want to do this only once, if possible, and definitely not every time you draw because it invokes a string comparison operation as it loops through the attributes array, which is computationally expensive. Once you have the index, you need to submit the data using the OpenGL ES function family called glVertexAttrib(). Like glUniform(), glVertexAttrib() is an alphabet-soup function with many different versions. However, since you're almost always going to be sending a large array of data to the shader when you're working with attributes, in practice, you almost always use the same function: glVertexAttribPointer(), which allows you to submit a variable length block of data to the attribute in your shader. Here's what a typical call to glVertexAttribPointer() might look like:
glVertexAttribPointer(positionAttribute, 3, GL_FLOAT, 0, 0, vertices);
The first parameter (positionAttribute in the previous line of code) is the index that corresponds to the attribute we're providing data for, the one we just retrieved from attributeIndex:. The second parameter (3 above) tells OpenGL ES how many data elements there are for each vertex or, in other words, how big a chunk of the submitted data should get sent to each run of the vertex shader. So, if you're submitting vertex position data (x,y,z), each run of the vertex shader needs three data elements, and this argument should be set to 3. If you are sending a color (r,g,b,a) for each vertex, each run of the vertex would need four elements and you would pass 4. The next argument tells OpenGL ES what type of data is submitted. In this case, each vertex is comprised of three GLfloats, so pass GL_FLOAT to tell it that. In theory, there are several values you could pass here, but in reality, since attributes have to be made up of one or more floating point variables, you will always pass GL_FLOAT.
The fourth argument to glVertexAtttribPointer() can be ignored. Just pass 0 for this argument. This element is used only with GL_FIXED datatypes. The GLfixed datatype allows you to represent a floating point value using integers, which allows for speedier calculations on systems that are slow at floating point operations, either because there's no GPU, or because the GPU internally uses fixed point representations of data. All iOS devices have a GPU that internally use floating point representations and which are capable of doing fast floating point math, so we'll never use the GLfixed datatype when programming for the iOS, and you don't have to worry about whether fixed point data values are normalized when sent to the shader.
We're not going to look at the fifth element right now. We're just going to pass 0 for this element for the time being. The fifth argument is known as the stride argument, and it can be used to pack more than one kind of data into a single block of data. We could, for example, pack our colors and vertices into a single interleaved array and use the stride argument to let OpenGL ES know to skip the color data when passing vertex attributes to the shader. We'll look at how to do data interleaving in the chapter on optimizing performance.
The final argument to glVertexAttribPointer() is the pointer to the actual data we're submitting for this attribute. This is going to be either an array or a pointer to a chunk of memory created with alloc().
For each attribute, there's a second call we have to make called glEnableVertexAttribArray(), passing the index of the attribute we're enabling. By default, all attributes are disabled, so we have to specifically tell OpenGL ES to enable an attribute in order for it to ship that attribute's data across to the shader. You can actually call this function just once after you link your program and then never worry about it again. However, it's a very low overhead call, and if an attribute were to get disabled somehow, it would be a very difficult problem to figure out. As a result, it's not uncommon to call glEnableVertexAttribArray() every time you draw to ensure that the attribute data gets sent to the shader.
Once your attributes have all been enabled and you've submitted your attribute data, you're ready to tell OpenGL ES to draw.
Drawing to a Close
The process of telling OpenGL ES to start rendering is kicked off by one of two function calls: glDrawArrays() or glDrawElements(). There are many nuances to drawing, and the easiest way to learn those nuances is to use the two functions. In the next chapter, we're going to build our first app, which will use glDrawArrays(). A few chapters later, we're going to learn about glDrawElements() and the reasons for having two different drawing functions in the first place.In this chapter, we've taken a look at OpenGL ES 2.0's programmable pipeline. You learned that vertex shaders run once for every vertex and that fragment shaders run once for every fragment, which corresponds to once for every pixel that will be drawn. You also saw what simple fragment and vertex shaders look like, and learned how to compile them and link a shader pair into a single OpenGL ES program. You even saw how to pass data from your application code to the shaders using uniforms and attributes and how to pass data between the vertex shader and the fragment shader using varyings.
This has been a long chapter, but now we're ready to put the programmable pipeline to use. Take a deep breath, pat yourself on the back for getting through all this boring, but important, up-front stuff.
1 - Actually, the iPad and iPhone 4 use Apple's A4 “system on a chip,” which has an integrated CPU and GPU on a single chip instead of separate CPU and GPU chips, but that doesn't really affect how you program for it, nor does it change the basic way that the two processors interact with each other.
2 - The chip in all iOS devices is capable of doing fast floating point math using something called vector processors. Your code doesn't automatically take advantage of the vector processors, however, so this statement is true, generally speaking. We'll look at how to leverage the vector processors in application code that runs on the CPU in the chapter on optimization.
3 - There's also a related function called glUniformMatrix() that we'll look at when we discuss matrix transformations in a future chapter. We don't want to get ahead of ourselves, but matrices are really nothing more than two-dimensional arrays of GLfloats.
0 comments:
Post a Comment